Adobe After Effects

3D wireframe animations with Cinema 4D & After Effects

In this Cinema 4D & After Effects CC 2017 Tutorial, learn how to create 3D wireframe animations, beginning with Cinema 4D R18 and adding effects in After Effects. By using this technique you can create the 3d wireframe look seen in film and on TV, and create your own 3D object animations with Cinema 4D and After Effects. This technique also utilizes new techniques for After Effects CC 2017 as well as working with Cinema 4D R18 Studio. This After Effects CC 2017 tutorial is also a great stepping stone to get into 3D animation and motion graphics for After Effects users.

Get Cinema 4D products used in this tutorial:

Want learn more about 3D animation in After Effects? Check out these other tutorials

Use Element 3D V2 in After Effects to create a 3D Logo

Create a 3D extruded logo in After Effects with Cinema 4D Lite


Like this tutorial? Consider becoming a Patron at Patreon.com/SeanFrangella to get additional benefits such as project files and more! 

To get weekly Motion Graphics, VFX, and 3D animation tutorials be sure to subscribe to the show on YouTube!

Looking for the next Tutorial to watch?

Check out the Top 5 Features of Element 3D V2 for After Effects!

Learn about the new 3D Character Creator app, Adobe Fuse!

Learn about the Top 5 new features of Cinema 4D R17!

Learn the Top 5 After Effects Expressions!

Learn how to Recreate the Agengers: Age of Ultron 3D Title Animation!

See how to Combine Element 3D with the new Saber Plug-in!

Learn about the Top 5 Hidden Features of Illustrator CC!

See how to bring Animated 3D Characters into Element 3D!

To check out new features added to Cinema 4D R16!

Check out the Top 5 Tips for Better Camera Animation in After Effects!

Using Expression Effects to Connect Effects in After Effects

In this After Effects CC 2017 Tutorial, learn how to use expressions to connect effects and effect parameters. By using expression linking in After Effects CC 2017, you can easily update multiple layers of animation and effects with one simple change. This technique builds on using the expresions pickwhip to enable connection of effects and parameters, as well as covers using the wiggle expression and other expression techniques.

Get the Element 3D products used in tutorials:

Want learn more about 3D animation in After Effects? Check out these other tutorials

Use Element 3D V2 in After Effects to create a 3D Logo

Create a 3D extruded logo in After Effects with Cinema 4D Lite


Like this tutorial? Consider becoming a Patron at Patreon.com/SeanFrangella to get additional benefits such as project files and more! 

To get weekly Motion Graphics, VFX, and 3D animation tutorials be sure to subscribe to the show on YouTube!

Looking for the next Tutorial to watch?

Check out the Top 5 Features of Element 3D V2 for After Effects!

Learn about the new 3D Character Creator app, Adobe Fuse!

Learn about the Top 5 new features of Cinema 4D R17!

Learn the Top 5 After Effects Expressions!

Learn how to Recreate the Agengers: Age of Ultron 3D Title Animation!

See how to Combine Element 3D with the new Saber Plug-in!

Learn about the Top 5 Hidden Features of Illustrator CC!

See how to bring Animated 3D Characters into Element 3D!

To check out new features added to Cinema 4D R16!

Check out the Top 5 Tips for Better Camera Animation in After Effects!

Create a Bendy Text Animation in After Effects with Element 3D

Element 3D V2 for After Effects added deformers such as bend, taper, and twist, which can be added to any 3D models or extrusions. Check out this new tutorial to learn how to create a bendy text animation using this new feature, as well as other Element 3D tips and tricks.

Get the Element 3D products used in this tutorial:

Want learn more about 3D animation in After Effects? Check out these other tutorials

Use Element 3D V2 in After Effects to create a 3D Logo

Create a 3D extruded logo in After Effects with Cinema 4D Lite


Like this tutorial? Consider becoming a Patron at Patreon.com/SeanFrangella to get additional benefits such as project files and more! 

To get weekly Motion Graphics, VFX, and 3D animation tutorials be sure to subscribe to the show on YouTube!

Looking for the next Tutorial to watch?

Check out the Top 5 Features of Element 3D V2 for After Effects!

Learn about the new 3D Character Creator app, Adobe Fuse!

Learn about the Top 5 new features of Cinema 4D R17!

Learn the Top 5 After Effects Expressions!

Learn how to Recreate the Agengers: Age of Ultron 3D Title Animation!

See how to Combine Element 3D with the new Saber Plug-in!

Learn about the Top 5 Hidden Features of Illustrator CC!

See how to bring Animated 3D Characters into Element 3D!

To check out new features added to Cinema 4D R16!

Check out the Top 5 Tips for Better Camera Animation in After Effects!

Create a 3D Logo in After Effects CC 2017 with the new Cinema 4D Renderer

With the release of Creative Cloud 2017, After Effects introduces yet another option to create 3D extrusions and 3D logos. As a quick alternative to jumping into Cinema 4D Lite and creating a full 3D logo and 3D scene, you can now create extrusions from shape layers right in After Effects CC 2017 using the new Cinema 4D Render engine. This new features lets you extrude shape layers and text, add materials, and create environment layers, without needing to leave After Effects. 

Check out more new features for Creative Cloud 2017

3D Titles in After Effects CC 2017 with the Cinema 4D Renderer

Live Text Templates in After Effects CC 2017 for Premiere Pro

To easily create 3D reflections in After Effects, check out these 360° Environment Map Products!


Want another way to work in 3D in After Effects? Check out these other tutorials

Create a 3D extruded logo in After Effects with Cinema 4D Lite

Use Element 3D V2 in After Effects to create a 3D Logo


Like this tutorial? Consider becoming a Patron at Patreon.com/SeanFrangella to get additional benefits such as project files and more! 

To get weekly Motion Graphics, VFX, and 3D animation tutorials be sure to subscribe to the show on YouTube!

Looking for the next Tutorial to watch?

Check out the Top 5 Features of Element 3D V2 for After Effects!

Learn about the new 3D Character Creator app, Adobe Fuse!

Learn about the Top 5 new features of Cinema 4D R17!

Learn the Top 5 After Effects Expressions!

Learn how to Recreate the Agengers: Age of Ultron 3D Title Animation!

See how to Combine Element 3D with the new Saber Plug-in!

Learn about the Top 5 Hidden Features of Illustrator CC!

See how to bring Animated 3D Characters into Element 3D!

To check out new features added to Cinema 4D R16!

Check out the Top 5 Tips for Better Camera Animation in After Effects!

Create 3D Titles in After Effects CC 2017 with the Cinema 4D Renderer

After Effects CC 2017 introduces the new Cinema 4D renderer natively in After Effects, allowing you to create 3D extruded text and shape layers, without needing to leave After Effects. This new feature replaces the legacy ray-traced renderer, utilizing Cinema 4D to render 3D elements under the hood. This new system allows you to extrude vector & text assets, create basic 3D materials, and create environment layers to add to 3D reflections.


Check out more new features for Creative Cloud 2017

Create a 3D Logo in After Effects CC 2017 with the Cinema 4D Renderer

Live Text Templates in After Effects CC 2017 for Premiere Pro
 

To easily create 3D reflections in After Effects, check out these 360° Environment Map Products!


Like this tutorial? Consider becoming a Patron at Patreon.com/SeanFrangella to get additional benefits such as project files and more! 

To get weekly Motion Graphics, VFX, and 3D animation tutorials be sure to subscribe to the show on YouTube!

Looking for the next Tutorial to watch?

Check out the Top 5 Features of Element 3D V2 for After Effects!

Learn about the new 3D Character Creator app, Adobe Fuse!

Learn about the Top 5 new features of Cinema 4D R17!

Learn the Top 5 After Effects Expressions!

Learn how to Recreate the Agengers: Age of Ultron 3D Title Animation!

See how to Combine Element 3D with the new Saber Plug-in!

Learn about the Top 5 Hidden Features of Illustrator CC!

See how to bring Animated 3D Characters into Element 3D!

To check out new features added to Cinema 4D R16!

Check out the Top 5 Tips for Better Camera Animation in After Effects!

Live Text Templates with After Effects & Premiere Pro CC 2017

With the update to Creative Cloud 2017 comes a really cool new feature for After Effects and Premiere Pro: Live Text Templates. With live text templates, you can create text animations in After Effects, and then import the project as a template in Premiere Pro, where you can easily replace text fields. This allows you to create re-useable templates for an entire editing project, without needing to re-render each text animation separately. Check out the video above to learn how this new feature for After Effects CC 2017 works!

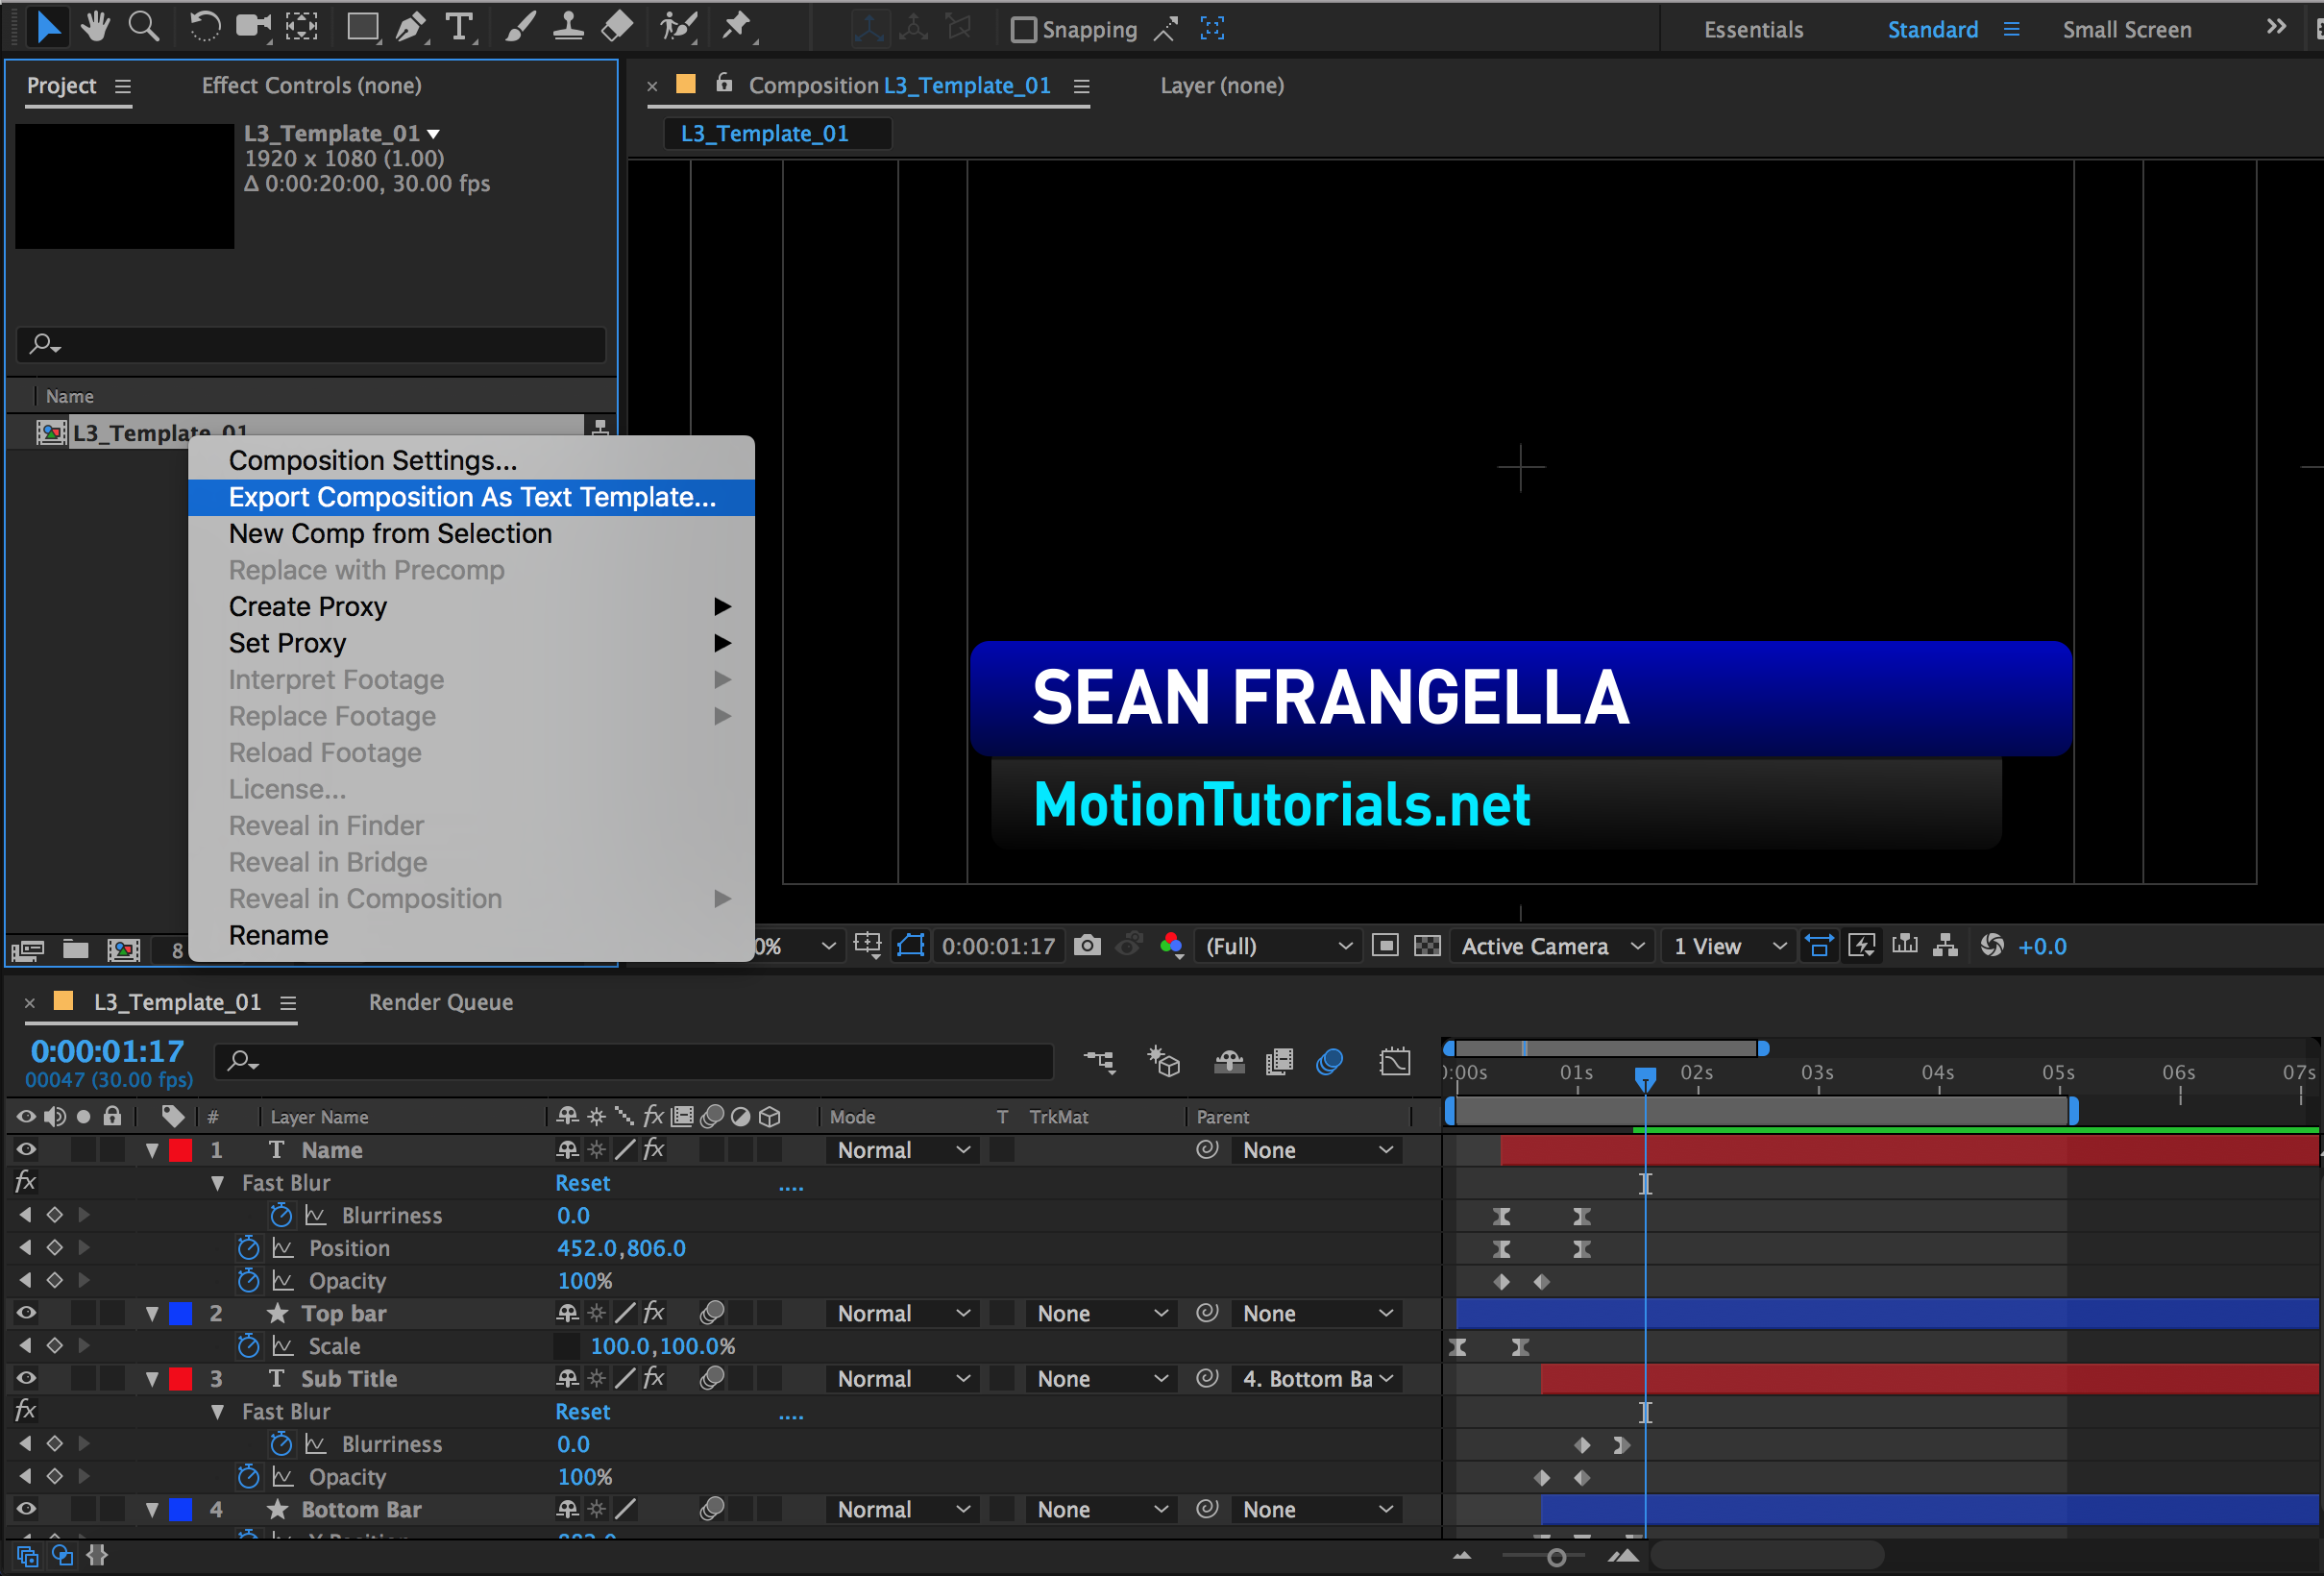
In the After Effects Project window, right-click a composition and selection "Export Composition as Text Template."

In the After Effects Project window, right-click a composition and selection "Export Composition as Text Template."

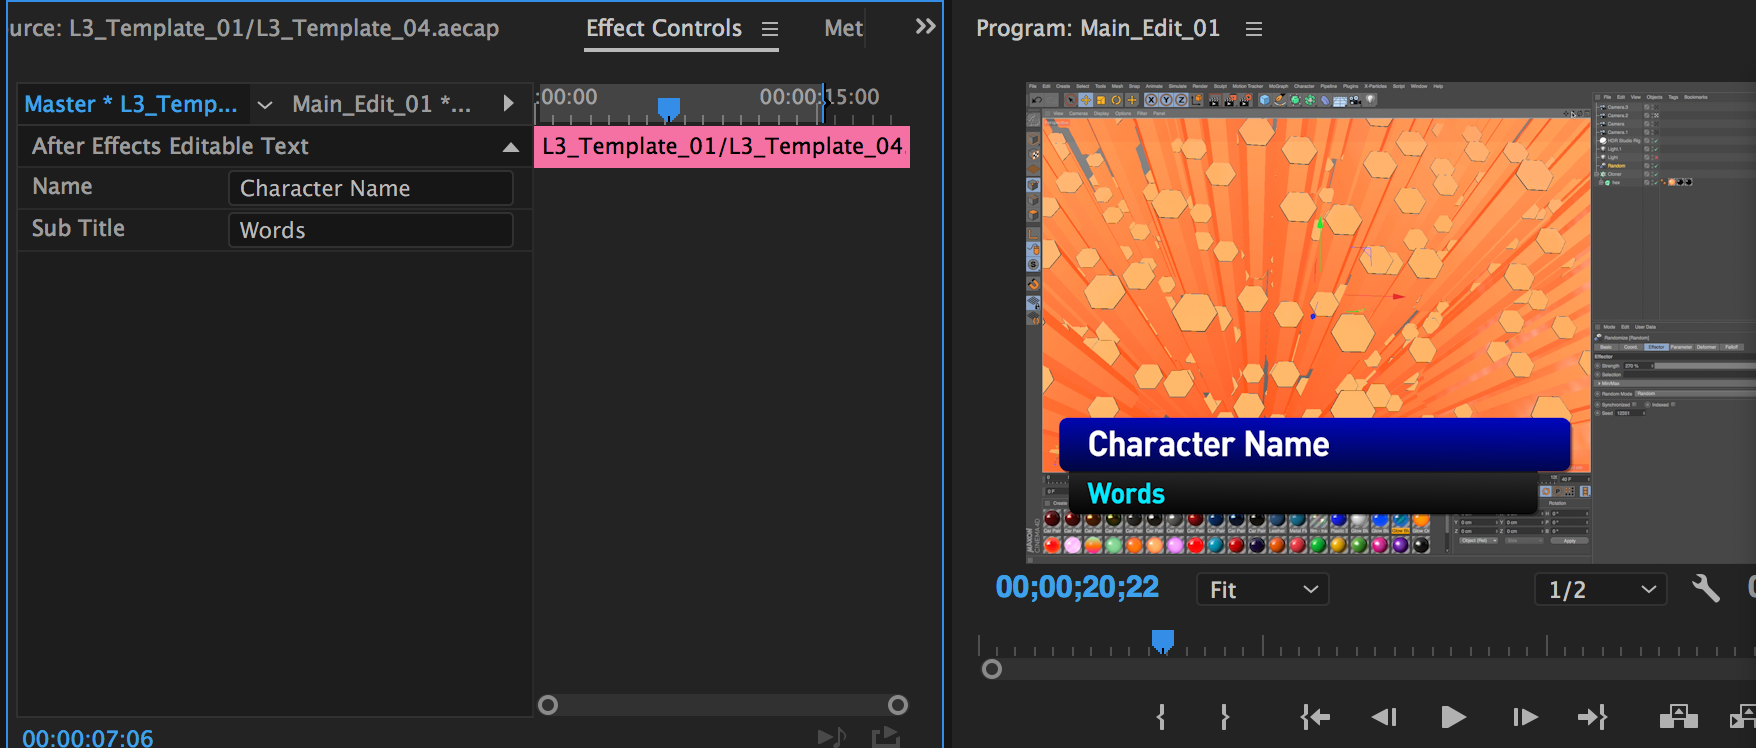
In the Source Monitor within Premiere Pro, select "Master" under the Effects Controls tab, and you can replace editable text fields.

In the Source Monitor within Premiere Pro, select "Master" under the Effects Controls tab, and you can replace editable text fields.


Check out more new features for Creative Cloud 2017

3D Titles in After Effects CC 2017 with the Cinema 4D Renderer

Create a 3D Logo in After Effects CC 2017 with the Cinema 4D Renderer

Speed up your Motion Graphics work with these After Effects 3D Products!


Like this tutorial? Consider becoming a Patron at Patreon.com/SeanFrangella to get additional benefits such as project files and more! 

To get weekly Motion Graphics, VFX, and 3D animation tutorials be sure to subscribe to the show on YouTube!

Looking for the next Tutorial to watch?

Check out the Top 5 Features of Element 3D V2 for After Effects!

Learn about the new 3D Character Creator app, Adobe Fuse!

Learn about the Top 5 new features of Cinema 4D R17!

Learn the Top 5 After Effects Expressions!

Learn how to Recreate the Agengers: Age of Ultron 3D Title Animation!

See how to Combine Element 3D with the new Saber Plug-in!

Learn about the Top 5 Hidden Features of Illustrator CC!

See how to bring Animated 3D Characters into Element 3D!

To check out new features added to Cinema 4D R16!

Check out the Top 5 Tips for Better Camera Animation in After Effects!
How to use Cinema 4D Object Buffers to create Masks and Track Mattes for Post-Production

Using Object Buffers in Cinema 4D makes it easy to create masks and track mattes for individual objects. Haven't heard of object buffers? What you can do is use the Compositing Tag to assign an object buffer to individual 3D objects, then when you render out a multi-pass render, you'll also render out a black and white version of the frame, with the selected object in white.

What's the point of that? Well, you can use this as a selection in Photoshop or as a Track Matte in After Effects. This way, you can add adjustments to individual elements of an animation wihtout needing to rotoscope or mask out the object. This can also be a huge time saver if you need to make an adjustment after you've already rendered the project.

An example of a 3D Render, rendered out as a PNG sequence from Cinema 4D

An example of a 3D Render, rendered out as a PNG sequence from Cinema 4D

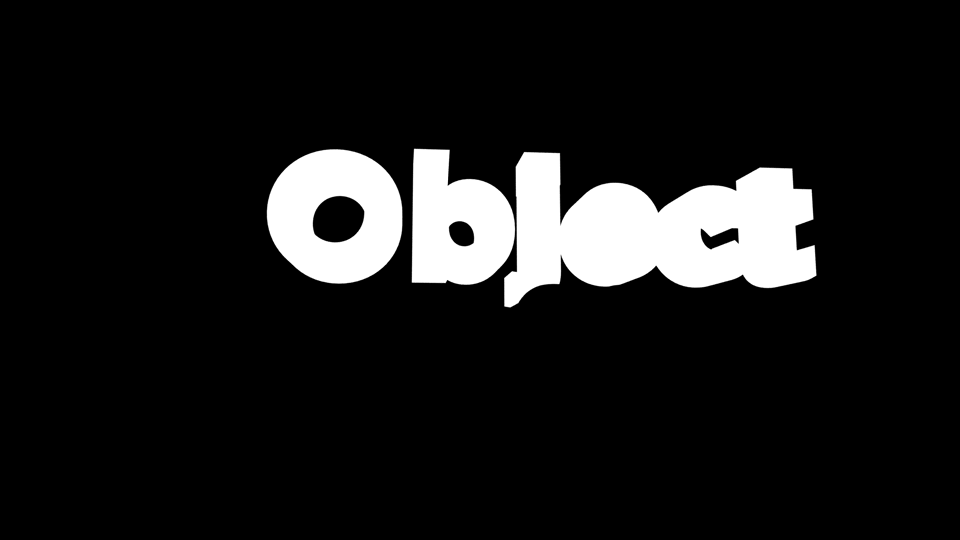
A corresponding Multi-Pass render with an Object Buffer set to the word "object"

A corresponding Multi-Pass render with an Object Buffer set to the word "object"


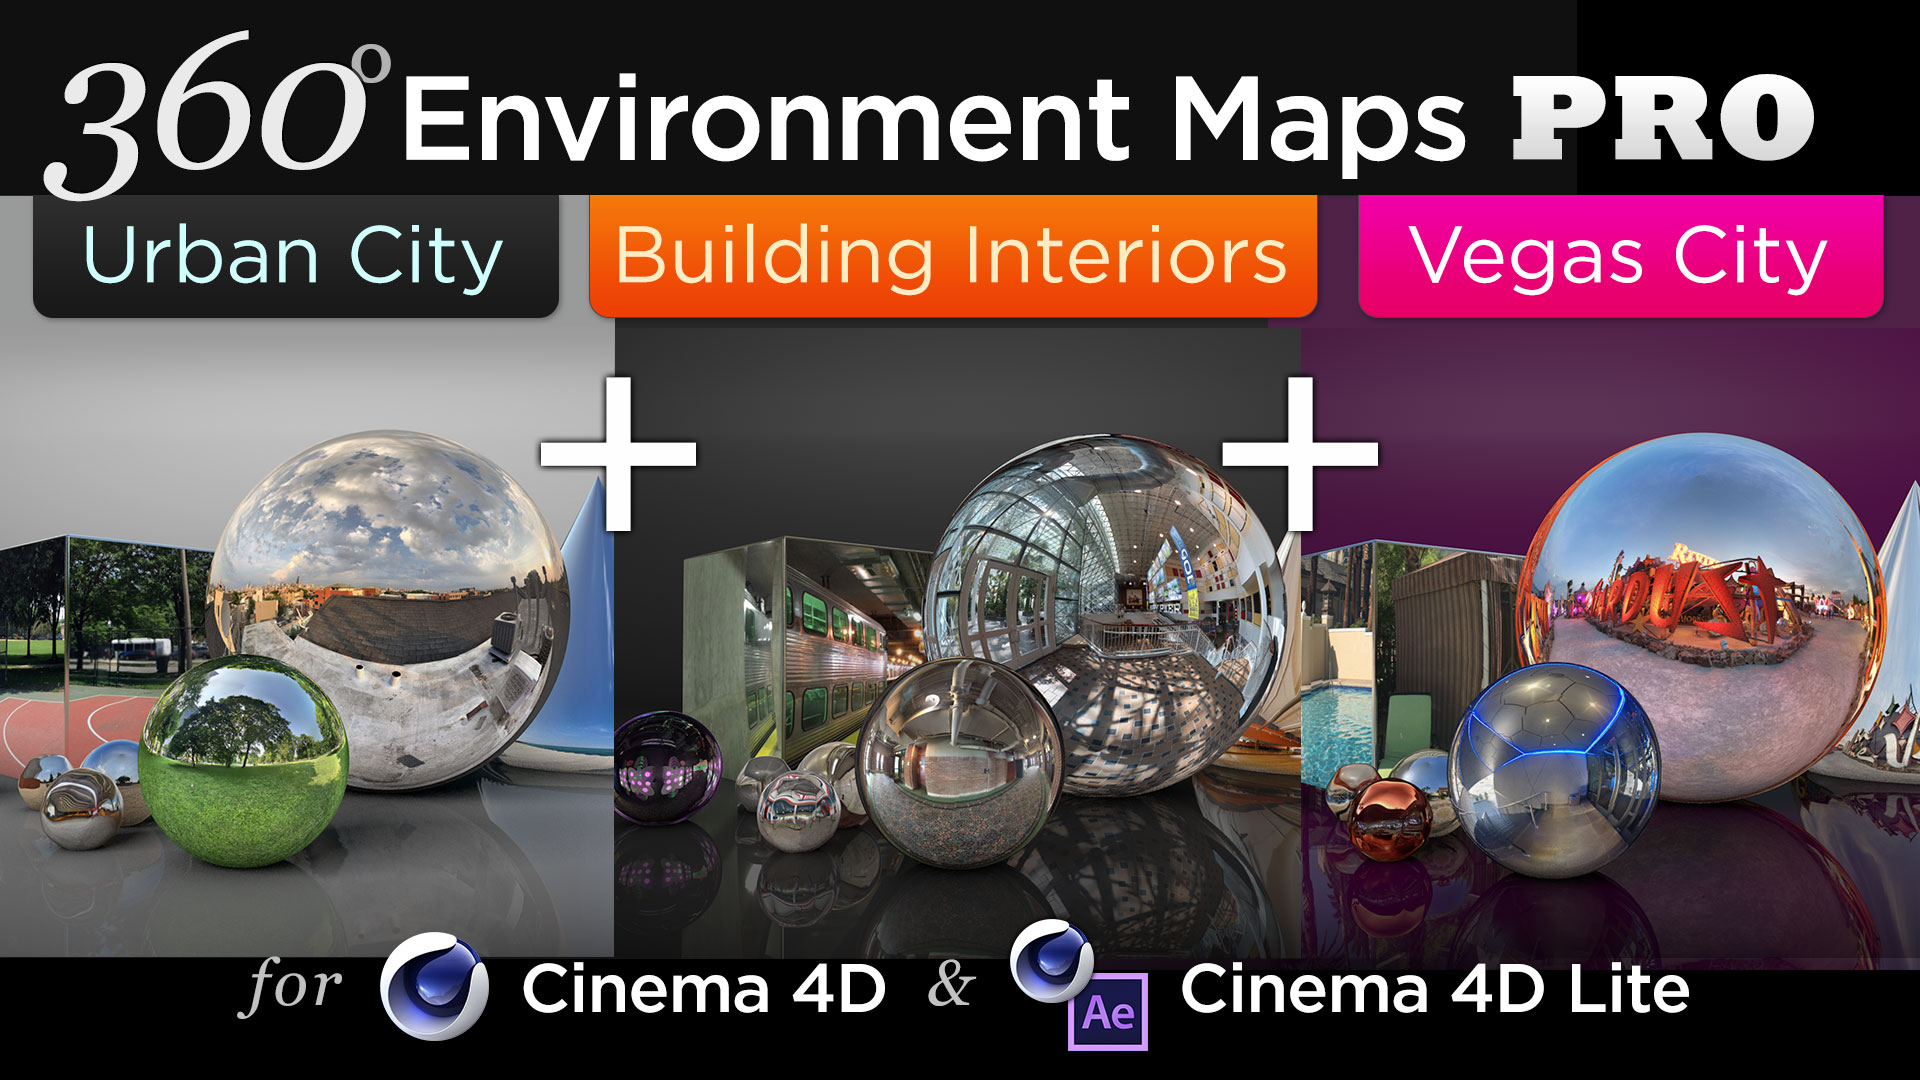
Want to greatly improve your 3D Renders?

Check out 360° Environment Maps Pro for Cinema 4D

Like this tutorial? Consider becoming a Patron at Patreon.com/SeanFrangella to get additional benefits such as project files and more! 

To get weekly Motion Graphics, VFX, and 3D animation tutorials be sure to subscribe to the show on YouTube!


Convert After Effects Text to 3D Text with the Cinema 4D Exporter in After Effects 2015.3

With every update to After Effects CC the past few years, there have continued to be improvements to the connection with Cinema 4D Lite, the free version of Cinema 4D that comes packed with After Effects. In the latest update to After Effects 2015.3, downloadable as of June 2016, a new feature was added to allow you to easily export text created in After Effects to real 3D Cinema 4D text, all through the Cinema 4D exporter. Check out the video above to learn about this awesome new feature!


Want to learn more about Cinema 4D Lite? Check out some of these tutorials:

• Create 3D Titles In After Effects CC Using Cinema 4D Lite

• Use Cinema 4D Lite MoGraph Effectors To Animate 3D Titles

• How To Create A 3D Extruded Logo In Cinema 4D Or Cinema 4D Lite

• Intro to Cinema 4D Lite Materials

Like this tutorial? Consider becoming a Patron at Patreon.com/SeanFrangella to get additional benefits such as project files and more! 

To get weekly Motion Graphics, VFX, and 3D animation tutorials be sure to subscribe to the show on YouTube!


Recreate the X-Men Apocalpyse 3D titles in After Effects with Element 3D

There have been a lot of nice 3D titles in movie trailers lately, so for this week's tutorial I decided to tackle recreating the 3D titles seen in X-Men Apocalypse using After Effects and the 3D plug-in Element 3D. While the focus of this one is the 3D text, there are a lot of small details that go a long way that I'll get into in this one, including customizing the bevel, using custom mask layers for the "X-Men" text instead of just basic text, creating letter-by-letter text using the multi-object setting, and many more Element 3D tips and tricks!

Want to get the project file for this tutorial and other movie title tutorials? You can purchase it in the online store for just a couple dollars!

Don't have the patience to watch the full tutorial? Check out this time-lapse video of the title animation being created in After Effects:

Like this tutorial? Consider becoming a Patron at Patreon.com/SeanFrangella to get additional benefits such as project files and more! 

To get weekly Motion Graphics, VFX, and 3D animation tutorials be sure to subscribe to the show on YouTube!


Want to see more movie title tutorials? Check out the next one on how to recreate the 3D titles for Star Trek Beyond in After Effects

Recreate the 3D Movie Title seen in Star Trek Beyond with Adobe After Effects

Any time I see new movie trailers, I always have my eye on the title animation at the end, and the 3D animated title for Star Trek Beyond did not disappoint. My brother Brett alerted me to this cool trailer, and I wanted to jump into After Effects and Element 3D to take a crack at recreating it. In this tutorial I outline a lot of the steps involved in recreating every element of this logo animation with After Effects CC.

Want to get the project file for this tutorial? You can purchase it in the online store for just a couple dollars!

Don't have the patience to watch the full tutorial? Check out this time-lapse video of the title animation being created in After Effects:

Like this tutorial? Consider becoming a Patron at Patreon.com/SeanFrangella to get additional benefits such as project files and more! 

To get weekly Motion Graphics, VFX, and 3D animation tutorials be sure to subscribe to the show on YouTube!


Want to see more movie title tutorials? Check out the next one on how to recreate the Avengers: Age of Ultron title using After Effects!

Game of Throne VFX Tutorial - Emulate the Blue Tint Film Look

An iconic look to the scenes in Game of Thrones taking place in Winterfell or involving the nights watch is the blue tint look. Using Adobe After Effects and the Lumetri color grading effect, you can recreate this stylized film look. In addition to the film look, you can also recreate the CG snow look in After Effects using Trapcode Particular.

Want to get the project file for this tutorial? You can purchase it in the online store for just a couple dollars!

To learn more about recreating the CG snow, check out the other part of this tutorial:

Game Of Thrones VFX Tutorial - Recreate CG Snow


Like this tutorial? Consider becoming a Patron at Patreon.com/SeanFrangella to get additional benefits such as project files and more! 

To get weekly Motion Graphics, VFX, and 3D animation tutorials be sure to subscribe to the show on YouTube!


Game of Thrones VFX Tutorial - Recreate CG Snow

A very powerful use of Trapcode Particular in After Effects is recreating volumetric, believable snow and snowstorms. This technique is frequently seen in Game of Thrones, when the scenes are taking place in Winterfell or involving the night's watch. In this tutorial, learn how to quickly recreate the CG snow look in a close-up shot using Trapcode Particular 2.5. This tutorial also covers new updates for Particular 2.5.

Want to get the project file for this tutorial? You can purchase it in the online store for just a couple dollars!

In addition to the CG snow, recreating this look involves creating the blue tint color grade. To learn about how to do that using the Lumetri Effect in After Effects, check out the other part of this tutorial here:

Game Of Throne VFX Tutorial - Emulate The Blue Tint Film Look


Like this tutorial? Consider becoming a Patron at Patreon.com/SeanFrangella to get additional benefits such as project files and more! 

To get weekly Motion Graphics, VFX, and 3D animation tutorials be sure to subscribe to the show on YouTube!


Use Cinema 4D Lite MoGraph Effectors to Animate 3D Titles in After Effects

One of the  best parts of working into Cinema 4D and Cinema 4D Lite is working with Mograph and Effectors. With C4D Lite, packaged FREE with After Effects CC, you get access to the Fracture object, and two Effectors: Plain, and Random. A lot of people overlook these objects because you have to register Cinema 4D Lite to get them to turn on. You know that window that pops up every time you start Cinema 4D Lite? Stop closing it and activate! This will give you access to the Mograph Effectors, which open up a HUGE amount of animation possibilities.

By Using MoGraph Fracture object, you can break apart text (or any extruded object) into separate objects using "explode objects + connect." This might look like it doesn't do anything at first, but once you start adding Effectors to the Fracture objects, you'll see the magic! This lets you animate position, scale, and rotation of each letter separately, and use strength or falloff to animate the letters in.

In Part 1 of this tutorial, I went over how to get the 3D text set up in Cinema 4D Lite and get the materials going. Check out Part 1 here.

Want to learn how to do this using MoText in the full Studio version of Cinema 4D? Check that out in this post here!

Looking for more Cinema 4D Lite tutorials?
 

Learn how to Create a 3D extruded logo in Cinema 4D or Cinema 4D Lite.

Then learn how to Work with Materials and Reflectance textures in Cinema 4D.

Next learn about 3D Lighting and HDRI Sky images in Cinema 4D.

And then learn about Creating Animation, working with Keyframes, and the Cinema 4D Timeline.


Like this tutorial? Consider becoming a Patron at Patreon.com/SeanFrangella to get additional benefits such as project files and more! 

To get weekly Motion Graphics, VFX, and 3D animation tutorials be sure to subscribe to the show on YouTube!


Create 3D Titles in After Effects CC using Cinema 4D Lite

Looking to create 3D text in After Effects? Put that text tool away kids, and crack open Cinema 4D Lite! Starting with the first version After Effects CC in 2013, Cinema 4D Lite is packaged FREE with AE. One of the biggest uses of Cinema 4D is how easily you can create professional 3D animation titles, with real 3D properties like shadows and reflections. 

In this tutorial, I get into how to get started with Cinema 4D Lite by creating 3D text titles. I also get into how the connection between C4D Lite and After Effects works, by utilizing the Cineware bridge. I also talk about setting up basic 3D materials, and how you can add all types of AE effects to Cinema 4D projects, like adjustment layers, background solids, and anything your After Effects heart desires!

In part 2 of this tutorial, we'll talk about adding MoGraph Effectors to the 3D text, in order to create letter-by-letter text animation. Check out Part 2 here.

Want to learn how to do this using MoText in the full Studio version of Cinema 4D? Check that out in this post here!

Looking for more Cinema 4D Lite tutorials?
 

Learn how to Create a 3D extruded logo in Cinema 4D or Cinema 4D Lite.

Then learn how to Work with Materials and Reflectance textures in Cinema 4D.

Next learn about 3D Lighting and HDRI Sky images in Cinema 4D.

And then learn about Creating Animation, working with Keyframes, and the Cinema 4D Timeline.


Like this tutorial? Consider becoming a Patron at Patreon.com/SeanFrangella to get additional benefits such as project files and more! 

To get weekly Motion Graphics, VFX, and 3D animation tutorials be sure to subscribe to the show on YouTube!


Import a Maya 3D Object into Element 3D V2 as an OBJ Model

If you are working with Element 3D V2 in After Effects for your 3D workflow, you might want to bring in a 3D object built in Maya. To do this, you first need to export the Maya scene as an OBJ model. Simple enough, right? That'll only bring the Maya object into Element 3D as one big object with the same texture. Great if you just want to slap one material on an object and move a 3D After Effects camera around it, but not great if you want assign different materials to different parts of the 3D object, or want to animate individual parts separately.

If you want to have different materials on different parts of the object, you'll have to do some additional set-up work in Maya to assign different materials to different parts of the object. This way, Element 3D will read the different materials as markers for different parts of the object. You can then assign new materials to each part of the 3D model in Element 3D. By doing this, with a new feature of Element 3D V2, you can also create animation on each individual piece by using Auxiliary or AUX Channels. To learn how to import 3D objects from Maya into Element 3D V2, check out the video above.

New to Element 3D? 

Start with How to create a 3D Logo with Shadows & Reflections!

Learn about the Top new Features of Element 3D V2!

Learn about how to use Cinema 4D Animations in Element 3D V2 in this video

And my shortcut tips and tricks for Element 3D V2 in this video!

Want to Motion Track a 3D Object using Element 3D? Learn how in this video!


For a step-by-step breakdown of the process of bringing a Maya 3D Object into Element 3D V2, you first need to turn on OBJ export in the Maya plug-ins manager, which is in Windows > Settings/Preferences > Plug-ins Manager. You then want to scroll down and check on "OBJexport.Bundle"

Check 'em both on and hit REFRESH!

Check 'em both on and hit REFRESH!

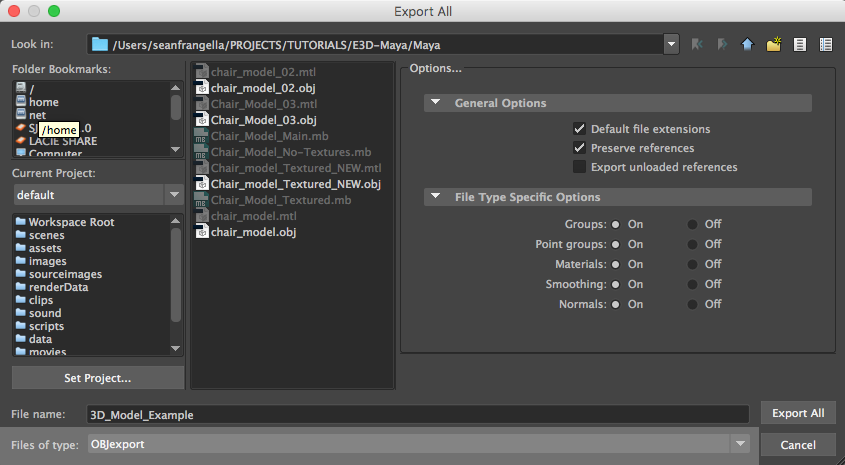
The next step is to export the Maya 3D Object as an OBJ, by going to File > Export all, and making sure you select "OBJexport" from the "Files of Type" drop-down.

Don't forget to change it to OBJ!

Don't forget to change it to OBJ!

Next, back in After Effects, within the scene settings for Element 3D V2, you'll want to hit the Import button and locate the OBJ Model.

That is one slick chair.

That is one slick chair.

This will bring in the 3D object as one big object and material. If you want to be able to assign different Element 3D V2 Materials to different parts of the object, you'll have to jump back over to Maya and do a bit of additional work. To allow Element 3D to read different parts of the 3D OBJ model as different materials, all you need to do is assign a new material to each piece of the object, by right clicking and selecting "Assign New Material."

Right-click like a champ.

Right-click like a champ.

It doesn't matter what color the material is, just that each part is a different material. I usually throw on a bunch of bright colors in Maya for reference, and end  with a crazy rainbow colored 3D Model in Maya that looks something like this:

Wow, that is colorful!

Wow, that is colorful!

This way, when you bring the 3D Object back into Element 3D V2 as an OBJ Model, each piece will be separate. This will allow you to assign new materials to each piece.

Colorful and shiny, and now usable in Element 3D!

Colorful and shiny, and now usable in Element 3D!

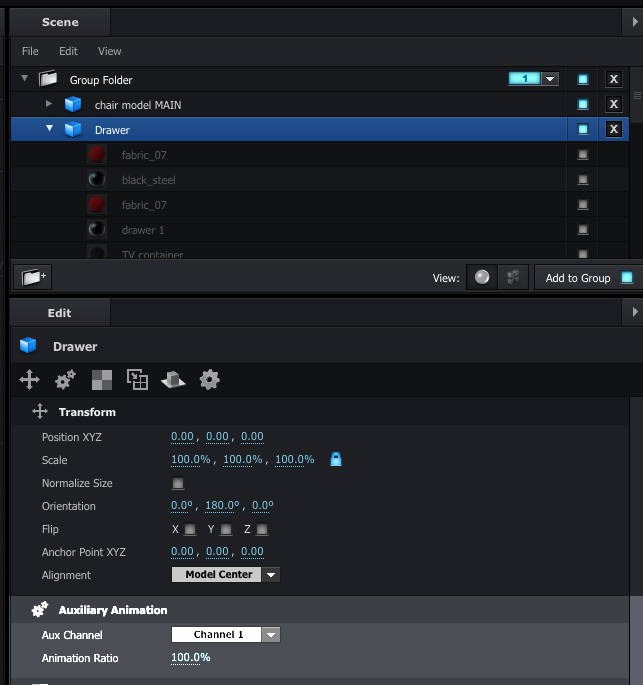
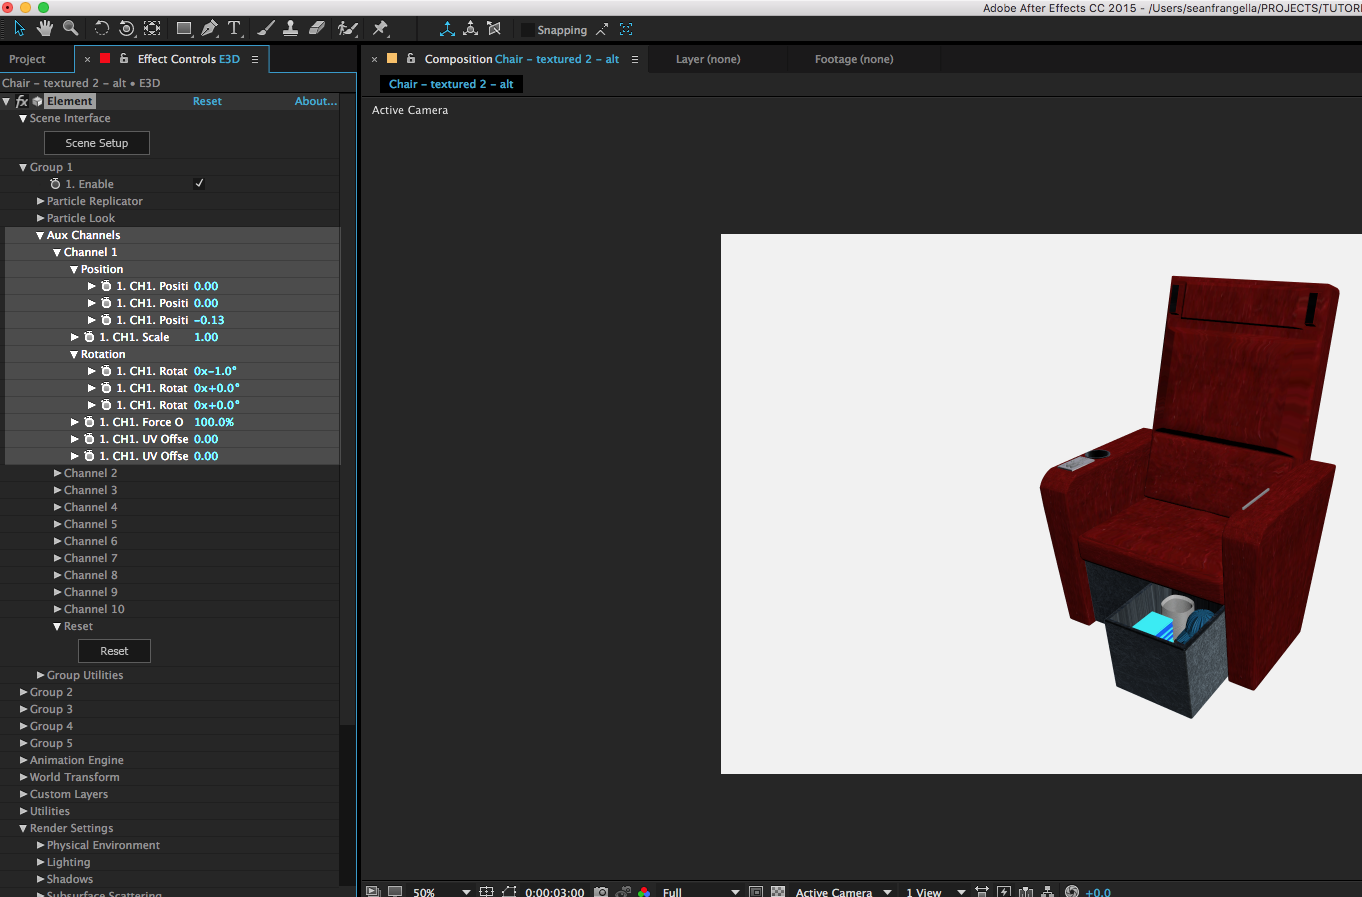
This process can also be used to animate each piece separately, by creating a duplicate of just one piece, and assigning it to an Auxiliary or AUX Channel. This setting is new to Element 3D V2, so be sure to update!

That is so many channels!

That is so many channels!

Then, after you've assigned different pieces to different AUX channels, you can animate position, scale, and rotation separately on the Element 3D effect, under Group > Aux Channels. This new system of groups with Aux channels massively grows the type of specific animation you can do in Element 3D V2.

So many animation possibilities!

So many animation possibilities!


Like this tutorial? Consider becoming a Patron at Patreon.com/SeanFrangella to get additional benefits such as project files and more! 

To get weekly Motion Graphics, VFX, and 3D animation tutorials be sure to subscribe to the show on YouTube!


Create a 3D write-on Animation by combining Element 3D with the new Saber plug-in

In my previous After Effects tutorial, I talked about how to Combine the new Saber plug-in with Element 3D text layers. In this new tutorial, I wanted to take that a bit further, and get into how to use saber to drive the animation of an Element 3D layer, to create a cool glowing write-on effect. I'm always trying to build everything as clean as possible, so we'll talk about how to create this full animation using only one set of keyframes.

New to Element 3D? 

Start with How to create a 3D Logo with Shadows & Reflections!

Learn about the Top new Features of Element 3D V2!

Learn about how to use Cinema 4D Animations in Element 3D V2 in this video

And my shortcut tips and tricks for Element 3D V2 in this video!

Want to Motion Track a 3D Object using Element 3D? Learn how in this video!


Like this tutorial? Consider becoming a Patron at Patreon.com/SeanFrangella to get additional benefits such as project files and more! 

To get weekly Motion Graphics, VFX, and 3D animation tutorials be sure to subscribe to the show on YouTube!


How to Combine New SABER Plug-in with Element 3D V2 Text Animations

When the new After Effects plug-in "Saber" was released by Video Copilot, I was excited to immediately dive in and see what this thing could do. One of the features Andrew Kramer showed in his kickoff video was the possibility of aligning Saber with Element 3D. He didn't get into the set-up though, so I wanted to take a crack at how to set this up and share it with everyone! 

In this video I'll go over how to link up Element 3D V2 and Saber to one single text layer, and how to set everything up so it will all align together, even when you start moving a camera around. This technique is also fully non-destructive to both elements, so the great part is that you could change the text to something completely new when you're done, and both the Element 3D and Saber layers will immediately update. Neat, right?!

New to Element 3D? 

Start with How to create a 3D Logo with Shadows & Reflections!

Learn about the Top new Features of Element 3D V2!

Learn about how to use Cinema 4D Animations in Element 3D V2 in this video

And my shortcut tips and tricks for Element 3D V2 in this video!

Want to Motion Track a 3D Object using Element 3D? Learn how in this video!


Like this tutorial? Consider becoming a Patron at Patreon.com/SeanFrangella to get additional benefits such as project files and more! 

To get weekly Motion Graphics, VFX, and 3D animation tutorials be sure to subscribe to the show on YouTube!


How to Extract Elements from Footage with the RotoBrush & Refine Edge Tool in After Effects CC

Sometimes you want to composite elements into the background of a shot, but a character is in the foreground, and you need the VFX elements to go between the character and the background. Or you have a really tricky shot where you need to isolate and extract one element from a shot, but didn't have a green screen handy.

Using the RotoBrush and Refine Edge tool in After Effects CC, you can mask out elements of a shot over time. Frame-by-frame masking and rotoscoping you say? Not in my workflow, grandpa! The rotobrush lets you quickly paint the element that you want to retain, and After Effects will use this data over time to handle the movement. The more information you give the RotoBrush tool the better, but it'll still be much faster than the painful process of frame-by-frame roto work. With the Refine Edge Tool, new to After Effects CC, you can now adjust the edges of the element even further, to account for tricky shots like hair.

Looking for more After Effects Tracking, Compositing, and Visual Effects Tutorials?

Learn about working with the After Effects 2D Tracker

Check out how to track Matte Paintings using the 3D Camera Tracker

Learn How to Track & Composite a 3D Object in Cinema 4D & After Effects


Like this tutorial? Consider becoming a Patron at Patreon.com/SeanFrangella to get additional benefits such as project files and more! 

To get weekly Motion Graphics, VFX, and 3D animation tutorials be sure to subscribe to the show on YouTube!


Top 5 Customization Tips & Preferences in After Effects CC

One of the cool updates to After Effects CC 2015 is the new Blue UI. In addition to changing the blue even further, you can further customize many elements of After Effects CC. Did you know that you can change all of the default layer colors in the timeline, or create a solid that defaults to the current position of the playhead in the timeline? Learn this and other After Effects CC customization tips in the video above.

My Top 5 After Effects CC customization Tips are:
• Create new layers at Current Time
• More Colorful layers and Masks
• Stacked Panels and new Workspace options
• Dashed grids and grid-lines
• An even BRIGHTER Blue UI


Like this tutorial? Consider becoming a Patron at Patreon.com/SeanFrangella to get additional benefits such as project files and more! 

To get weekly Motion Graphics, VFX, and 3D animation tutorials be sure to subscribe to the show on YouTube!


How to Link Optical Flares to Element 3D Animations in After Effects

One of the major benefits to working with Element 3D in After Effects is that it works directly in the 3D Space of After Effects. This means that when you add an After Effects camera, BOOM, you can orbit around your 3D object. This also helps to be able to link up Element 3D scenes with additional plug-ins, like another Video Copilot plug-in, Optical Flares. In this video, learn how to link up Element 3D V2 with Optical Flares, and have everything move and animate together.

New to Element 3D? 

Start with How to create a 3D Logo with Shadows & Reflections!

Learn about the Top new Features of Element 3D V2!

Learn about how to use Cinema 4D Animations in Element 3D V2 in this video

And my shortcut tips and tricks for Element 3D V2 in this video!

Want to Motion Track a 3D Object using Element 3D? Learn how in this video!


Like this tutorial? Consider becoming a Patron at Patreon.com/SeanFrangella to get additional benefits such as project files and more! 

To get weekly Motion Graphics, VFX, and 3D animation tutorials be sure to subscribe to the show on YouTube!