Cinema 4D Lite

Create a 3D Logo in After Effects CC 2017 with the new Cinema 4D Renderer

With the release of Creative Cloud 2017, After Effects introduces yet another option to create 3D extrusions and 3D logos. As a quick alternative to jumping into Cinema 4D Lite and creating a full 3D logo and 3D scene, you can now create extrusions from shape layers right in After Effects CC 2017 using the new Cinema 4D Render engine. This new features lets you extrude shape layers and text, add materials, and create environment layers, without needing to leave After Effects. 

Check out more new features for Creative Cloud 2017

3D Titles in After Effects CC 2017 with the Cinema 4D Renderer

Live Text Templates in After Effects CC 2017 for Premiere Pro

To easily create 3D reflections in After Effects, check out these 360° Environment Map Products!


Want another way to work in 3D in After Effects? Check out these other tutorials

Create a 3D extruded logo in After Effects with Cinema 4D Lite

Use Element 3D V2 in After Effects to create a 3D Logo


Like this tutorial? Consider becoming a Patron at Patreon.com/SeanFrangella to get additional benefits such as project files and more! 

To get weekly Motion Graphics, VFX, and 3D animation tutorials be sure to subscribe to the show on YouTube!

Looking for the next Tutorial to watch?

Check out the Top 5 Features of Element 3D V2 for After Effects!

Learn about the new 3D Character Creator app, Adobe Fuse!

Learn about the Top 5 new features of Cinema 4D R17!

Learn the Top 5 After Effects Expressions!

Learn how to Recreate the Agengers: Age of Ultron 3D Title Animation!

See how to Combine Element 3D with the new Saber Plug-in!

Learn about the Top 5 Hidden Features of Illustrator CC!

See how to bring Animated 3D Characters into Element 3D!

To check out new features added to Cinema 4D R16!

Check out the Top 5 Tips for Better Camera Animation in After Effects!

Create 3D Titles in After Effects CC 2017 with the Cinema 4D Renderer

After Effects CC 2017 introduces the new Cinema 4D renderer natively in After Effects, allowing you to create 3D extruded text and shape layers, without needing to leave After Effects. This new feature replaces the legacy ray-traced renderer, utilizing Cinema 4D to render 3D elements under the hood. This new system allows you to extrude vector & text assets, create basic 3D materials, and create environment layers to add to 3D reflections.


Check out more new features for Creative Cloud 2017

Create a 3D Logo in After Effects CC 2017 with the Cinema 4D Renderer

Live Text Templates in After Effects CC 2017 for Premiere Pro
 

To easily create 3D reflections in After Effects, check out these 360° Environment Map Products!


Like this tutorial? Consider becoming a Patron at Patreon.com/SeanFrangella to get additional benefits such as project files and more! 

To get weekly Motion Graphics, VFX, and 3D animation tutorials be sure to subscribe to the show on YouTube!

Looking for the next Tutorial to watch?

Check out the Top 5 Features of Element 3D V2 for After Effects!

Learn about the new 3D Character Creator app, Adobe Fuse!

Learn about the Top 5 new features of Cinema 4D R17!

Learn the Top 5 After Effects Expressions!

Learn how to Recreate the Agengers: Age of Ultron 3D Title Animation!

See how to Combine Element 3D with the new Saber Plug-in!

Learn about the Top 5 Hidden Features of Illustrator CC!

See how to bring Animated 3D Characters into Element 3D!

To check out new features added to Cinema 4D R16!

Check out the Top 5 Tips for Better Camera Animation in After Effects!

Convert After Effects Text to 3D Text with the Cinema 4D Exporter in After Effects 2015.3

With every update to After Effects CC the past few years, there have continued to be improvements to the connection with Cinema 4D Lite, the free version of Cinema 4D that comes packed with After Effects. In the latest update to After Effects 2015.3, downloadable as of June 2016, a new feature was added to allow you to easily export text created in After Effects to real 3D Cinema 4D text, all through the Cinema 4D exporter. Check out the video above to learn about this awesome new feature!


Want to learn more about Cinema 4D Lite? Check out some of these tutorials:

• Create 3D Titles In After Effects CC Using Cinema 4D Lite

• Use Cinema 4D Lite MoGraph Effectors To Animate 3D Titles

• How To Create A 3D Extruded Logo In Cinema 4D Or Cinema 4D Lite

• Intro to Cinema 4D Lite Materials

Like this tutorial? Consider becoming a Patron at Patreon.com/SeanFrangella to get additional benefits such as project files and more! 

To get weekly Motion Graphics, VFX, and 3D animation tutorials be sure to subscribe to the show on YouTube!


Adobe Creative Graphic Design on Twitch.TV - Creating a 3D Logo in Photoshop 3D or Cinema 4D

I had the pleasure of popping in on Adobe's Twitch channel over at Twitch.tv/Adobe, where I talked with Adobe's Paul Trani about the different options for taking a 3D logo from illustrator and creating a 3D image out of it. We talk about the differences between 3D in Photoshop and a full 3D package such as Cinema 4D. In the first half of this live stream recording, Paul gets into some fun ways you can bring a vector logo from Illustrator into Photoshop, and in the second portion I get into cracking opening Cinema 4D or Cinema 4D Lite (included in After Effects CC) to create a 3D logo out of the "Creativity 360" illustration that we started with.

Whether you're completely new to working in 3D animation in either Photoshop or Cinema 4D, or a seasoned pro, this live show is packed with tons of tips for working in 3D.

Here is a still render of what we worked up during the live show:

When in doubt, add a bunch of colorful glows around the edges. Instant pop!

When in doubt, add a bunch of colorful glows around the edges. Instant pop!

You can also now follow me on Twitch for live videos tutorials, Q&A sessions, and the occasional Fallout 4 webcast at Twitch.tv/SeanFrangella


Like this tutorial? Consider becoming a Patron at Patreon.com/SeanFrangella to get additional benefits such as project files and more! 

To get weekly Motion Graphics, VFX, and 3D animation tutorials be sure to subscribe to the show on YouTube!


Use Cinema 4D Lite MoGraph Effectors to Animate 3D Titles in After Effects

One of the  best parts of working into Cinema 4D and Cinema 4D Lite is working with Mograph and Effectors. With C4D Lite, packaged FREE with After Effects CC, you get access to the Fracture object, and two Effectors: Plain, and Random. A lot of people overlook these objects because you have to register Cinema 4D Lite to get them to turn on. You know that window that pops up every time you start Cinema 4D Lite? Stop closing it and activate! This will give you access to the Mograph Effectors, which open up a HUGE amount of animation possibilities.

By Using MoGraph Fracture object, you can break apart text (or any extruded object) into separate objects using "explode objects + connect." This might look like it doesn't do anything at first, but once you start adding Effectors to the Fracture objects, you'll see the magic! This lets you animate position, scale, and rotation of each letter separately, and use strength or falloff to animate the letters in.

In Part 1 of this tutorial, I went over how to get the 3D text set up in Cinema 4D Lite and get the materials going. Check out Part 1 here.

Want to learn how to do this using MoText in the full Studio version of Cinema 4D? Check that out in this post here!

Looking for more Cinema 4D Lite tutorials?
 

Learn how to Create a 3D extruded logo in Cinema 4D or Cinema 4D Lite.

Then learn how to Work with Materials and Reflectance textures in Cinema 4D.

Next learn about 3D Lighting and HDRI Sky images in Cinema 4D.

And then learn about Creating Animation, working with Keyframes, and the Cinema 4D Timeline.


Like this tutorial? Consider becoming a Patron at Patreon.com/SeanFrangella to get additional benefits such as project files and more! 

To get weekly Motion Graphics, VFX, and 3D animation tutorials be sure to subscribe to the show on YouTube!


Create 3D Titles in After Effects CC using Cinema 4D Lite

Looking to create 3D text in After Effects? Put that text tool away kids, and crack open Cinema 4D Lite! Starting with the first version After Effects CC in 2013, Cinema 4D Lite is packaged FREE with AE. One of the biggest uses of Cinema 4D is how easily you can create professional 3D animation titles, with real 3D properties like shadows and reflections. 

In this tutorial, I get into how to get started with Cinema 4D Lite by creating 3D text titles. I also get into how the connection between C4D Lite and After Effects works, by utilizing the Cineware bridge. I also talk about setting up basic 3D materials, and how you can add all types of AE effects to Cinema 4D projects, like adjustment layers, background solids, and anything your After Effects heart desires!

In part 2 of this tutorial, we'll talk about adding MoGraph Effectors to the 3D text, in order to create letter-by-letter text animation. Check out Part 2 here.

Want to learn how to do this using MoText in the full Studio version of Cinema 4D? Check that out in this post here!

Looking for more Cinema 4D Lite tutorials?
 

Learn how to Create a 3D extruded logo in Cinema 4D or Cinema 4D Lite.

Then learn how to Work with Materials and Reflectance textures in Cinema 4D.

Next learn about 3D Lighting and HDRI Sky images in Cinema 4D.

And then learn about Creating Animation, working with Keyframes, and the Cinema 4D Timeline.


Like this tutorial? Consider becoming a Patron at Patreon.com/SeanFrangella to get additional benefits such as project files and more! 

To get weekly Motion Graphics, VFX, and 3D animation tutorials be sure to subscribe to the show on YouTube!


Create Looping Animations in Cinema 4D using the Animation Track Properties

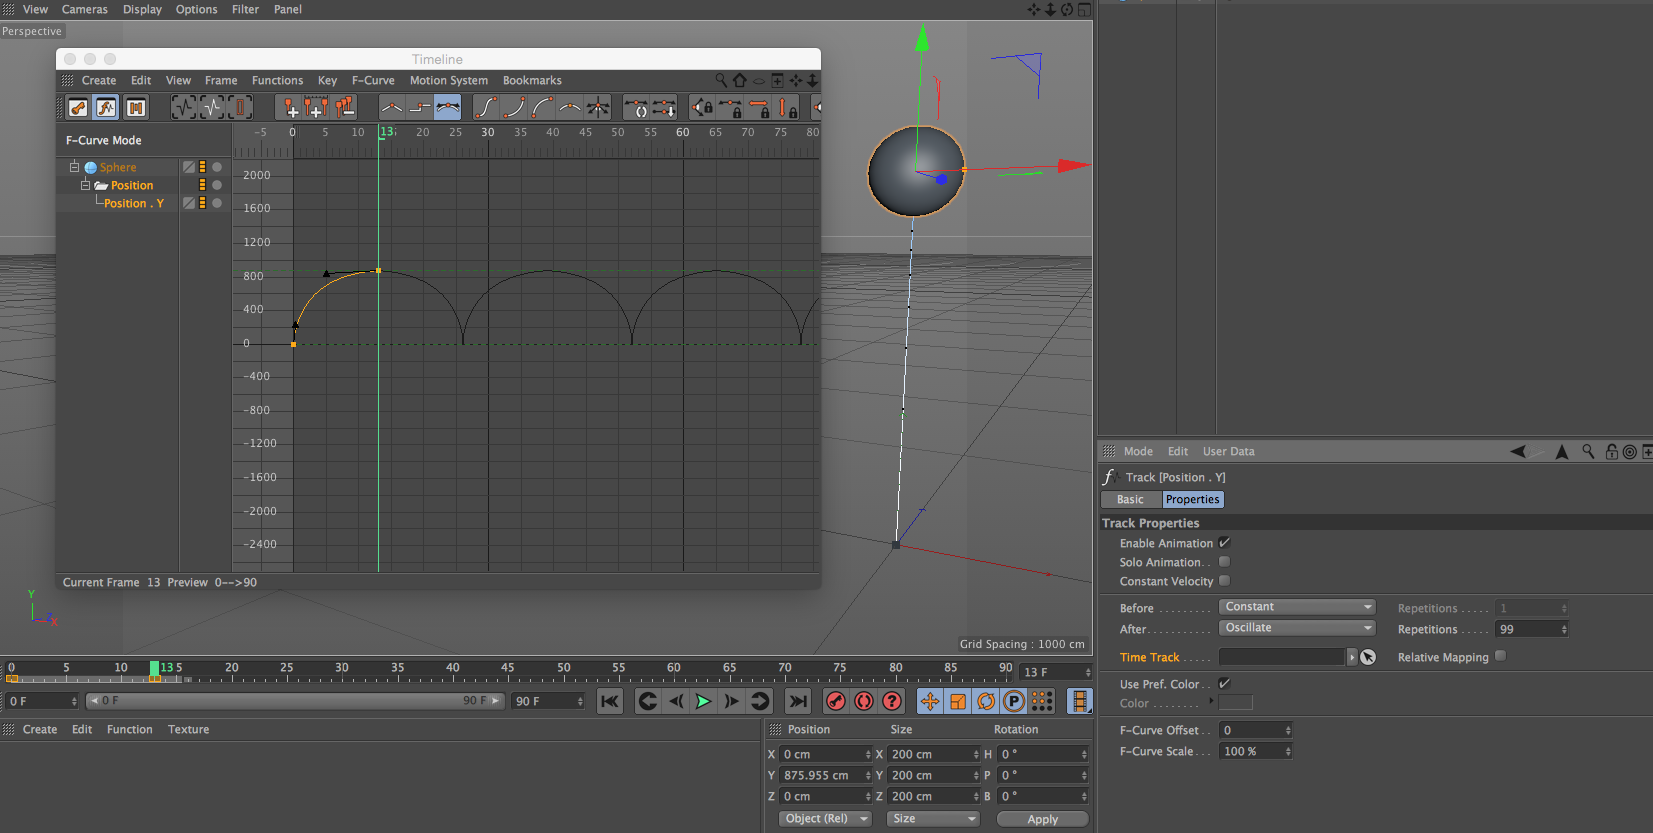
Looking to create looping animations in Cinema 4D, and end up just copying the keyframes over and over? Well no more! If you're familiar with After Effects Expressions, you can loop animations using the loopOut expression. If you're looking to do something similar in Cinema 4D, you might want to just create a bunch of copied keyframes, or look to writing some crazy Xpresso scripts to handle the looping. But by using the animation track properties in the attributes window, you can loop animations a set number of times using the Oscillate setting in the Track Properties, under attributes.

This technique can be utilized in both the full Studio version of Cinema 4D, as well as the After Effects version, Cinema 4D Lite.

Want to learn more about Cinema 4D Lite to get off the ground in 3D?
 

Learn how to Create a 3D extruded logo in Cinema 4D or Cinema 4D Lite.

Then learn how to Work with Materials and Reflectance textures in Cinema 4D.

Next learn about 3D Lighting and HDRI Sky images in Cinema 4D.

And then learn about Creating Animation, working with Keyframes, and the Cinema 4D Timeline.

To get started with this technique of creating looping animations in Cinema 4D, all you need to do is create 2 keyframes. Here we have the top and bottom points of a sphere animating vertically, in order to create the bouncing look.

Look at that smooooth curve.

Look at that smooooth curve.

With the full Cinema 4D timeline open (accessible via Window > Timeline), when you click on the track, it'll open up the Track Properties under attributes. This is where you can adjust what happens before and after the two keyframes.

Houston, we have looping!

Houston, we have looping!

By changing the "After" dropdown to "Oscillate," the animation will repeat. This way all you have to adjust is that one animation curve, and it will change the entire animation. If you want it to loop infinitely, you can change the number of repetitions. Now that's a nice loop!

When will it end?!?!?! Oh, after 99 times.

When will it end?!?!?! Oh, after 99 times.

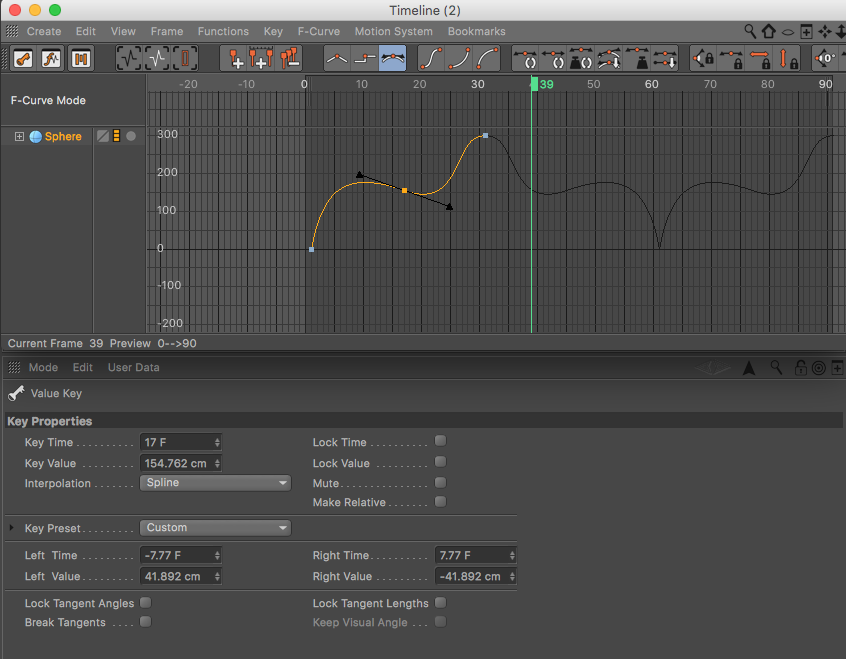
If you want to go further with this technique, you can add additional keyframes and loop keyframe animations beyond two. After adding in an additional keyframe in the center, as an example, it will loop the full set. Getting a bit deeper into f-Curve animations in the Cinema 4D timeline, you can hold SHIFT to adjust online one side of the tangent, ALT/OPTION to adjust only the VALUE, and COMMAND to adjust only what is happening over TIME.

BoooooOOOOooo. Urns.

BoooooOOOOooo. Urns.


Like this tutorial? Consider becoming a Patron at Patreon.com/SeanFrangella to get additional benefits such as project files and more! 

To get weekly Motion Graphics, VFX, and 3D animation tutorials be sure to subscribe to the show on YouTube!


How to link Optical Flares to Cinema 4D Animations in After Effects

One of the the best things about the newer integration between Cinema 4D and After Effects CC is the Cineware integration, which allows you to bring Cinema 4D or Cinema 4D Lite files into After Effects directly, without needing to render them out. Additionally, you can use Cineware to extract elements out of Cinema 4D and bring them into After Effects, and have everything perfectly line up. 

In this video, we'll talk about taking an animated logo from Cinema 4D into After Effects, and use Cineware to link up Video Copilot's Optical Flares plug-in, and have everything work in alignment. We'll also talk about using Cineware to rip out a depth pass, in order to occlude certain parts of a scene.

Want to learn more about Cinema 4D Lite to get off the ground in 3D?

Learn how to Create a 3D extruded logo in Cinema 4D or Cinema 4D Lite.

Then learn how to Work with Materials and Reflectance textures in Cinema 4D.

Next learn about 3D Lighting and HDRI Sky images in Cinema 4D.

And then learn about Creating Animation, working with Keyframes, and the Cinema 4D Timeline.

Finally, learn some Fancy post-production effects like linking Optical Flares to Cinema 4D Animations.


Like this tutorial? Consider becoming a Patron at Patreon.com/SeanFrangella to get additional benefits such as project files and more! 

To get weekly Motion Graphics, VFX, and 3D animation tutorials be sure to subscribe to the show on YouTube!


Working with Animation, the Timeline, and Keyframes in Cinema 4D

Creating animation using Keyframes and the Timeline is one of the core skills when working in Cinema 4D, or any animation program for that matter. If you are coming from After Effects CC, the Cinema 4D system of animation can have some slight differences. Once you understand these differences on how the timeline and keyframes work, you'll be an animation pro in no time.

In this video, learn how to create Position, Scale, and Rotation keyframes in Cinema 4D Lite. Once we have that down, we'll talk about the full timeline, and how to manipulate timing uses eases and animation curves. We'll also talk about concepts like creating overshoot, and other animation principles. 

Want to learn more about Cinema 4D Lite to get off the ground in 3D?

Learn how to Create a 3D extruded logo in Cinema 4D or Cinema 4D Lite.

Then learn how to Work with Materials and Reflectance textures in Cinema 4D.

Next learn about 3D Lighting and HDRI Sky images in Cinema 4D.

And then learn about Creating Animation, working with Keyframes, and the Cinema 4D Timeline.

Finally, learn some Fancy post-production effects like linking Optical Flares to Cinema 4D Animations.


Like this tutorial? Consider becoming a Patron at Patreon.com/SeanFrangella to get additional benefits such as project files and more! 

To get weekly Motion Graphics, VFX, and 3D animation tutorials be sure to subscribe to the show on YouTube!


Intro to 3D Lighting, Shadows, and HDR Sky Images in Cinema 4D

Creating a 3D logo in Cinema 4D Lite and then adding custom Materials is great and all, but what does it matter if there are no lights in your scene to light anything? 3D lighting can drastically impact how your scene appears, the same way that manipulating the lighting on a film set can completely change the look, tone, and mood of a scene. 

In this Cinema 4D Lite tutorial, learn about the basics of working with 3D lights and shadows. Next, learn how to work with the Sky image to create environment reflections that will appear throughout your scene. You'll be a professional 3D gaffer in no time!

Want to learn more about Cinema 4D Lite to get off the ground in 3D?

Learn how to Create a 3D extruded logo in Cinema 4D or Cinema 4D Lite.

Then learn how to Work with Materials and Reflectance textures in Cinema 4D.

Next learn about 3D Lighting and HDRI Sky images in Cinema 4D.

And then learn about Creating Animation, working with Keyframes, and the Cinema 4D Timeline.

Finally, learn some Fancy post-production effects like linking Optical Flares to Cinema 4D Animations.


Like this tutorial? Consider becoming a Patron at Patreon.com/SeanFrangella to get additional benefits such as project files and more! 

To get weekly Motion Graphics, VFX, and 3D animation tutorials be sure to subscribe to the show on YouTube!


Intro to Cinema 4D Materials - Working with Reflections & Reflectance Materials

Creating custom materials in Cinema 4D or Cinema 4D Lite can be a very powerful way to drastically change how your 3D scenes appear. There have been some major updates to how materials and reflectance works starting in Cinema 4D R16, so whether you're completely new to materials, or familiar with Materials in Cinema 4D and want to know where the hell the Reflection tab went, you'll be up to speed in no time on how 3D materials work in Cinema 4D.

In this video, I'll cover how to make a quick reflective material using the legacy settings, and then get into how the new layered Reflectance system works starting in Cinema 4D Lite R16.

Want to learn more about Cinema 4D Lite to get off the ground in 3D?

Learn how to Create a 3D extruded logo in Cinema 4D or Cinema 4D Lite.

Then learn how to Work with Materials and Reflectance textures in Cinema 4D.

Next learn about 3D Lighting and HDRI Sky images in Cinema 4D.

And then learn about Creating Animation, working with Keyframes, and the Cinema 4D Timeline.

Finally, learn some Fancy post-production effects like linking Optical Flares to Cinema 4D Animations.

Like this tutorial? Consider becoming a Patron at Patreon.com/SeanFrangella to get additional benefits such as project files and more! 


Like this tutorial? Consider becoming a Patron at Patreon.com/SeanFrangella to get additional benefits such as project files and more! 

To get weekly Motion Graphics, VFX, and 3D animation tutorials be sure to subscribe to the show on YouTube!


How to Create a 3D Extruded Logo in Cinema 4D or Cinema 4D Lite

Completely new to working in 3D using Cinema 4D, or looking to create a 3D animation using a logo? One of Cinema 4D's most powerful features is how quick and easy it can be to create a nice looking 3D logo from an existing logo. In this 5 part series, learn about getting started with Cinema 4D using Cinema 4D Lite, packaged for free with After Effects CC. In this first part we'll talk about bringing your logo from illustrator into Cinema 4D, creating the 3D geometry, and building out the 3D logo in a smart way.

Want to learn more about Cinema 4D Lite to get off the ground in 3D?
 

Learn how to Create a 3D extruded logo in Cinema 4D or Cinema 4D Lite.

Then learn how to Work with Materials and Reflectance textures in Cinema 4D.

Next learn about 3D Lighting and HDRI Sky images in Cinema 4D.

And then learn about Creating Animation, working with Keyframes, and the Cinema 4D Timeline.

Finally, learn some Fancy post-production effects like linking Optical Flares to Cinema 4D Animations.


Like this tutorial? Consider becoming a Patron at Patreon.com/SeanFrangella to get additional benefits such as project files and more! 

To get weekly Motion Graphics, VFX, and 3D animation tutorials be sure to subscribe to the show on YouTube!


Create a Flat Design Title sequence using Cinema 4D or Cinema 4D Lite

For this video, I wanted to go over how to recreate the flat design technique using Cinema 4D or Cinema 4D Lite inside of After Effects CC. This was also a good opportunity to show off the new Cogwheel object in Cinema 4D, that was added in Cinema 4D R16.

Ever since the Apple went flat with the UI design of the iPhone, flatter, minimal colors and design have been more and more popular. This was very apparent during the end credits of Captain America: Winter Soldier. I love this style of animation, where it looks like everything is flat, 2-dimensional pieces, with sudden camera movement revealing that the objects are actually 3D. Check out the reference at the video below to see the inspiration for this tutorial.

Like this tutorial? Consider becoming a Patron at Patreon.com/SeanFrangella to get additional benefits such as project files and more! 

To get weekly Motion Graphics, VFX, and 3D animation tutorials be sure to subscribe to the show on YouTube!


Captain America: Winter Solider End Credits


Using the Composite Background Tag in Cinema 4D to cast realistic shadows on top of Footage

When you're compositing 3D models into live action footage or photos using Cinema 4D, getting the shadows to cast and feel realistic can be one of the trickiest parts. Luckily Cinema 4D has the "Composite Background Tag" to do just that. In this video I go over how to get it set up using a still photo with a ground and wall, and casting the shadows from 3D objects onto the physical surfaces.

This Cinema 4D VFX & Compositing tutorial also covers overall Cinema 4D R16 texturing and modeling tips and tricks.


Like this tutorial? Consider becoming a Patron at Patreon.com/SeanFrangella to get additional benefits such as project files and more! 

To get weekly Motion Graphics, VFX, and 3D animation tutorials be sure to subscribe to the show on YouTube!


Looking for the next Tutorial to watch?

Check out the Top 5 Features of Element 3D V2 for After Effects at this video!

Learn about the Top 5 new features of Cinema 4D R17 at this video!

Learn the Top 5 After Effects Expressions in this video!

Learn how to recreate the Agengers: Age of Ultron 3D logo in this video!

To check out new features added to Cinema 4D R16, check out this video!


Top 5 New Features of Cineware Version 2.0 in After Effects

Cineware is the connection in After Effects that allows Cinema 4D files to be used in AE projects, without needing to first render out the C4D files. There are some great and very useful updates that came with the update to Cineware in Version 2.0, and in this video I go over my top 5 new features.

The new Cineware top features include Cinema 4D Lite R16, R16 Reflections and Reflectance compatibility, After Effects Region of Interest compatibility, Cineware layer synchronization, and collect Cinema 4D files now working.

Looking to get started with Cinema 4D Lite? Start with this tutorial!

Like this tutorial? Consider becoming a Patron at Patreon.com/SeanFrangella to get additional benefits such as project files and more! 

To get weekly Motion Graphics, VFX, and 3D animation tutorials be sure to subscribe to the show on YouTube!


How to Track & Composite 3D Models into Live Action Footage using Cinema 4D & After Effects - Part 2

In Part 2 of this Cinema 4D Lite Motion Tracking Tutorial, learn how to 3D motion track a moving camera shot, send tracking information to Cinema 4D for 3D tracking, composite any 3D model or element into the shot, combine the footage and C4D file in After Effects CC using Cineware, light and texture the 3D model, and add final compositing techniques including color correction, environment reflections, and a shadow pass to create realistic shadows and lighting.

Watch Part 1 of this tutorial on tackling the Tracking in After Effects Here

Looking for more After Effects Tracking, Compositing, and Visual Effects Tutorials?

Start with Part 1, working with the After Effects 2D Tracker

Check out Part 2, Matte Painting using the 3D Camera Tracker


Like this tutorial? Consider becoming a Patron at Patreon.com/SeanFrangella to get additional benefits such as project files and more! 

To get weekly Motion Graphics, VFX, and 3D animation tutorials be sure to subscribe to the show on YouTube!


How to Track & Composite 3D Models into Live Action Footage using Cinema 4D & After Effects

Compositing 3D models into live action footage is when things get really serious in the world of Visual Effects. Using Cinema 4D Lite and the Cineware connection in After Effects CC, you can now track and composite 3D models into footage much more easier than ever! In this tutorial I cover how to do the camera tracking in After Effects, send that to Cinema 4D, and then how to light and composite any 3D model into footage, including getting the shadows right! 

Be sure to check our Part 2 of this Tutorial on 3D Compositing Here!

Looking for more After Effects Tracking, Compositing, and Visual Effects Tutorials?

Start with Part 1, working with the After Effects 2D Tracker

Check out Part 2, Matte Painting using the 3D Camera Tracker

Like this tutorial? Consider becoming a Patron at Patreon.com/SeanFrangella to get additional benefits such as project files and more! 

To get weekly Motion Graphics, VFX, and 3D animation tutorials be sure to subscribe to the show on YouTube!


How to Model & Texture 3D Baseball Bats 3 Different ways using Cinema 4D

In this Cinema 4D tutorial, learn 3 different ways to model and texture a 3D baseball bat in Cinema 4D R16. This Cinema 4D tutorial covers various workflows to create a 3D baseball bat, techniques, tips & tricks and three different techniques for modeling a 3D baseball bat in Cinema 4D, including using a lathe, loft modeling, and polygonal subdivision surface techniques. 

This free Cinema 4D tutorial also covers texturing techniques for different ways to texture realistic baseball bats in Cinema 4D, 3D modeling tips on using Cinema 4D with subdivision surface, as well as lathe and loft modeling tools.


Like this tutorial? Consider becoming a Patron at Patreon.com/SeanFrangella to get additional benefits such as project files and more! 

To get weekly Motion Graphics, VFX, and 3D animation tutorials be sure to subscribe to the show on YouTube!